
1. ABSTRACT
The Smart Import object facilitates the upload of data (master data, transactional data) to Board. Before, Dataviews with line number entities or CSV blob cubes with export/import procedures were required to upload the data. In addition, a complex check logic (if implemented at all) was required to detect wrong codes or whether the user is allowed to upload certain coordinates between dimensions.
The Smart Import object provides a master data and value validation check before data is loaded. Therefore, the user knows immediately why rows are rejected respectively the full upload is not successful.
This article looks at different use cases and how they can be managed with the smart import. It is not a replacement for the general manual but adds examples/clarifications for certain topics.
2. CONTENT
The smart import respects the data model security settings. When the data entry is restricted for a certain perimeter due to the global data model security settings and cube visibility/cube data entry restrictions the smart import does not allow the data entry.
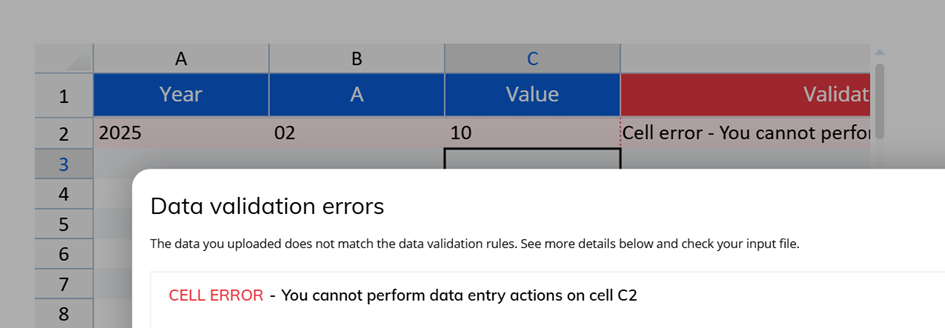
Figure 1: Data Entry restricted on Smart Import
Dataflows and data readers do not respect this restriction (on purpose).
2.1 Add New Members
By default, Board sets the Rule to “Add new Members”. Therefore, set this setting to “Discard New Members”. Only if you like to allow adding new members then leave it on the default. This is a critical topic.

Figure 2: Data Behavior Rules - Drop Down Menu
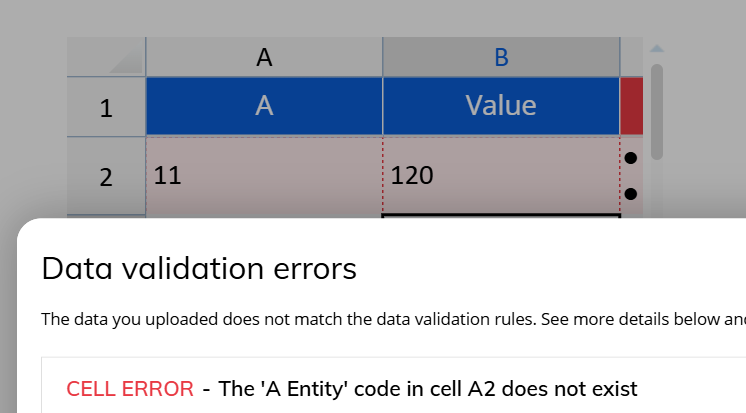
Figure 3: Data Behavior Rules - Element does not exist
2.2 Discard Outside Selection
The screen selection can be used to restrict the upload perimeter, i.e. if a year is uploaded which is not part of the screen selection, then the upload runs into an error. By default, this setting is deactivated, but (by default) it should be activated.

Figure 4: Discard Outside Selection - Setting
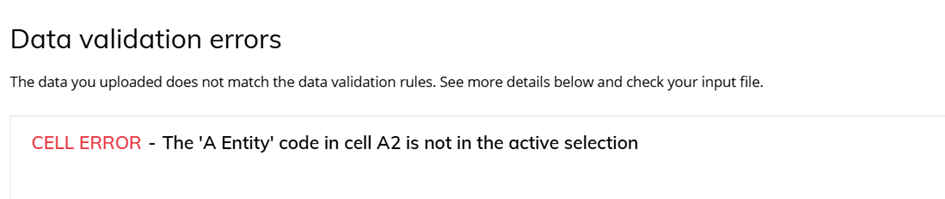
Figure 5: Discard Outside Selection - Error
2.3 Client Filters
When the upload e.g. only takes place for ONE element of an entity which is set by the screen or security selection, then it should not be required for the user to provide the value. An example: The planning is open for the current year and only values are allowed to be uploaded for this year. Therefore, the option Client Filter can be used instead of requiring the year as an additional information column.
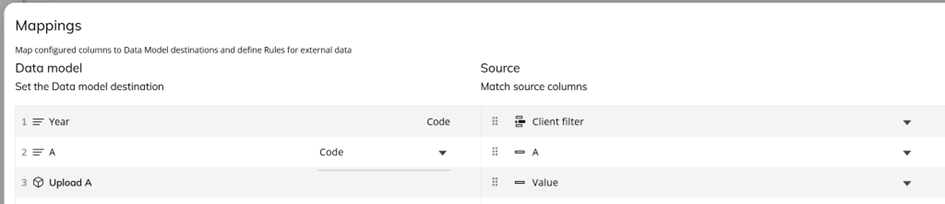
Figure 6: Client Filter - Settings

Figure 7: Client Filter – Overview (Left: Without vs. Right: Client Filters used)
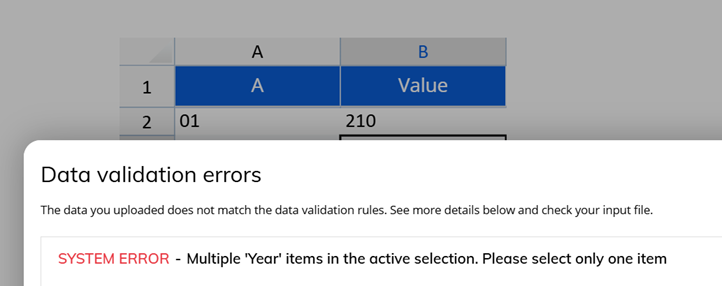
Figure 8: Client Filter - Error - Multiple Selections
This method can be used also for the User entity, if further data processing is required and the concurrency of the upload process must be guaranteed. In this case, the User entity is also part of the cube dimensions. Keep in mind: For unrestricted Administrator users the selection to one element of the user entity must be set, e.g. using a pager, on open screen trigger etc.
2.4 Maintaining Descriptions
The smart import can be used to maintain the description of elements. As these settings are different from a data reader, it is shown here.
- Select the Entity.
- Choose Description (a second line is generated)
- Map Data Model and Source
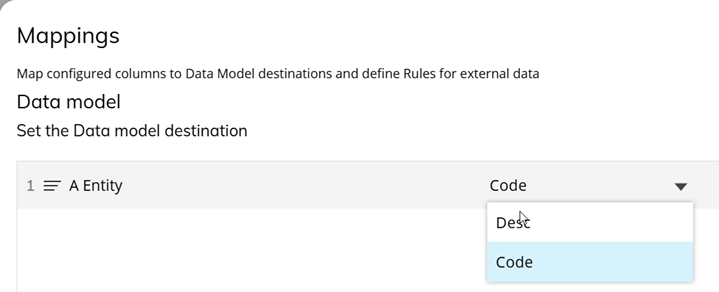
Figure 9: Description - After step 1

Figure 10: Description - After step 2
2.5 Relationships
The smart import can be used to change relationships between entities. While it might be intended for the creation of new master data, this might not be wanted for master data maintenance. Please make sure that relationships cannot be changed if this is not your intention, i.e. entities of the same tree with a connection should not be loaded.
2.6 Algorithm - Reference
Beside input columns as source, algorithms can also be used. In the algorithm a reference to a column can be made, like this example using the column header name:
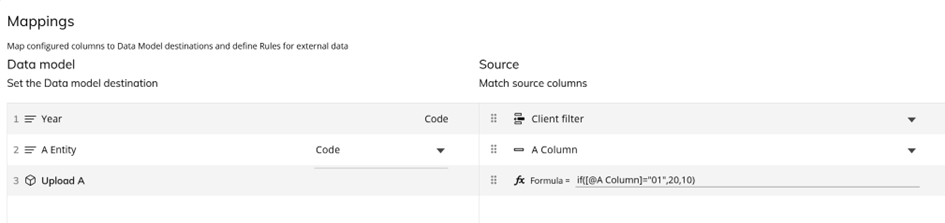
Figure 11: Algorithm Column Reference
Also, the column letter can be used in the formula, like this: if(a=”01”,20,10)
Preferably, the column letter should be used as column headers might be changed due to UI requirements.
2.7 Blank Cells
Smart import like data entry, do not differentiate between NULL and zero. While in the layout, there is the option to flag it, in the smart import is required an additional configuration.
If there’s the specific request to differentiate between zero and NULL, the following formulas must be applied:
if(ISBLANK([@Amount ]),0,if([@Amount ]=0,1E-30,[@Amount ]))
In this way:
- if the user is loading/input a blank cell, a 0 will be loaded (0 and NULL have the same meaning in Board), users will see and empty cell.
- if the user is loading/input a "0", Board will load the 1E-30, so users will see "0" in the Board Tables.
- in case of any other value, it is loaded as usual.
3. Upload cubes vs. Direct Upload
There might be reasons why dedicated upload cubes need to be used instead of the final target cubes in the smart import. Please keep in mind: The Smart Import can do a merge natively. For upload cubes this process needs to be implemented manually.
Reasons:
- Data preparation (E.g. Monthly Columns, further calculations), further export/import processes (Please be aware of possible Concurrency topics)
- More detailed rejection information (e.g. data entry is not possible because process is closed > could also be provided as information on the upload screen instead)
- Upload confirmation before processing
- Dialogs
- Backup uploaded values
- Screen selection can be manipulated (E.g. selecting a different year)
- Disconnection between upload and input cube
No valid reasons:
- Less dimensions in the smart import due to selections (E.g. on the year) > Use Client Filter
3.1 Concurrency
Concurrency (users upload data at the same time and use the same perimeters) can become a particularly important topic for the smart import. In the case the smart import object is used to upload the values directly to the target cube without any data preparation/processing, then no further actions are required.
But if separate upload cubes are used and users could run it at the same time, the process should be secured against concurrency.
Measures:
- (Consideration) Add a user entity to the upload cubes. Build the security to include the user entity and its restriction (e.g. Select User = @User ). Take care of exceptional cases where no restriction is set, e.g. Administrator users.
- Clear the upload cubes after the data processing (with selections).
- Continue data processing with virtual cubes.
4. Months in columns
The smart import object does not provide a function to upload month column values. Therefore, it is required to e.g. create 12 monthly upload cubes (Year, Customer, Product, [User]) – one for each month.

Figure 12: Monthly Columns
The data needs to be prepared after the upload in a trigger procedure – to map it to the corresponding month in the target cube.
5. Multiple input types
The smart import object allows three ways of input:
- Manual Input
- Copy & Paste
- Excel (is deactivated by default. Should be enabled “by default”)
The Manual Input can be supported by adding suggested values (Always click “Save Suggested Values” at the bottom after changes.). In the case the target entity is used, Code & Description can be used, and it will be successful in the upload. The downside: Copy & Pasting the line to another row will not work. For the manual input also the “Allow free input” can be allowed. Then only the code is allowed for entities. Copy & Paste is not restricted by this setting.
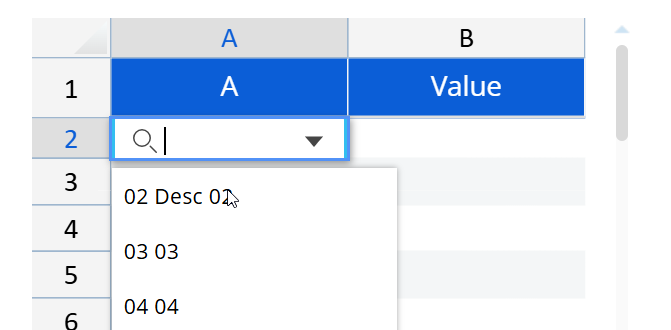
Figure 13: Manual Input - Suggested Values
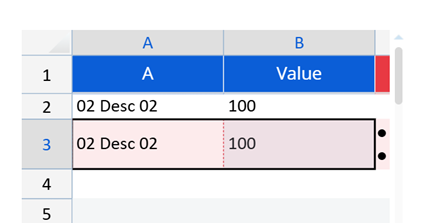
Figure 14: Manual Input - Suggested Values - Copy & Paste Error (1st line works, 2nd not)
Copy & Paste and Excel Upload always expect the Code for an entity. Otherwise, it will not work.
6. Replacing Line Number Layouts
The old DataView Line Number layouts (i.e. a number entity was created for having rows in the layout) can be replaced by the smart import. Create upload cubes with all required entities. Add suggested values for the entities by using the target entity. In the case the number is used for the element creation, the auto-incremental setting can be used for a dedicated upload entity.
Example New Asset/Investment:
- Value Cube (Auto-Incremental Upload Entity, Cost Center, Asset Class, Month, User) (Month = Start Month)
- Asset Description Cube (Auto-Incremental Upload Entity, Cost Center, Asset Class, Month, User) (Month = Start Month)
- A Save trigger procedure will Export/Import the information and information will be loaded to the final target entities, e.g. Investment entity, Investment Cost Center entity, …
- Target Cubes: Start Month & Value (Year, Investment)
The dedicated upload entity must not be cleared if used.
7. Creating new master data
The smart import can also be used for the creation of new master data – as mentioned before. As this can create a mess in the database, this should be well considered. Also, it should be defined who should be able to do this.
The smart import object does not contain natively any security for entities; therefore the creation cannot be prevented when the user can access the smart import. Therefore, it should be considered to add an invisible cube to the smart import which has some security (data model security) in place. If the data entry is not allowed on this cube, then smart import and creation of new members will fail.

Figure 15: Security on new Master data – Smart Import

Figure 16: Security on new Master data - Settings
8. Same entity multiple times in the row/upload
A special case is the reference of the same entity multiple times in the same row.
Example:
Product | Sales Unit | Production Unit | Conversion Factor |
|---|
This upload should be able to provide the manual input (i.e. drop-down selection available, no new creation of elements) and Copy&Paste/Excel-Upload. In this case two new entities were created above the target unit entity – especially for the smart import. Two upload cubes were created, one using the Smart Import Unit 1 and the other Smart Import Unit 2. In the save trigger procedure the values were copied to the required target cubes on the target unit entity.


